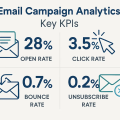


Email deliverability is the share of your sent messages that actually reach recipients’ inboxes. It is not the same as sending an email. You can press send and still fail to reach many recipients. Deliverability measures whether mail servers accept and place your messages where people will see them.
How authentication affects deliverability
Receiving servers use technical checks to decide whether to accept and place messages. Three protocols matter: SPF, DKIM and DMARC. In plain terms:
- SPF lists which servers may send mail for your domain. If mail comes from an unlisted server, receivers may treat it as suspicious.
- DKIM adds a cryptographic signature to each message so the receiver can verify it wasn’t altered.
- DMARC ties SPF and DKIM results to a policy you publish. It tells receivers how to handle failures and sends you reports about problems.
When these checks pass, receiving systems are more likely to accept your mail and place it in the inbox. When they fail, filters move messages to spam or reject them. Anti-phishing systems also use these records to detect spoofed mail that pretends to be from your brand.
SPF. What it does and how to set it up correctly
SPF is a simple rule you publish in DNS that names which servers are allowed to send mail for your domain. When a receiving mail server gets a message claiming to be from your domain, it checks the SPF record. If the sending server is on the list, the check passes. If it is not, the server may mark the message as suspicious, send it to spam, or reject it.
SPF is published as a TXT record in DNS. A minimal, generic example you can copy and adapt:
| v=spf1 ip4:203.0.113.0/24 include:spf.example.net -all |
- v=spf1 — SPF version
- ip4:203.0.113.0/24 — allows that IPv4 range to send mail (203.0.113.0/24 is a documentation IP range; replace with your real IPs)
- include:spf.example.net — includes another domain’s SPF rules (useful for third-party senders)
- -all — hard fail: reject mail from any other source
SPF mechanics:
- Mechanisms — ip4, ip6, a, mx, include tell receivers which senders are allowed. They are evaluated in order until one matches.
- Modifiers — -all (fail), ~all (softfail), ?all (neutral). -all is strict — use it only after you’ve confirmed all legitimate senders. ~all lets you monitor while reducing outright rejections.
- Order matters — SPF checks stop at the first matching mechanism. Put specific IPs or includes first to avoid accidental matches.
- Lookup limit — SPF evaluations may perform DNS lookups (for include, mx, a, etc.). There is a hard limit of 10 DNS lookups. Exceeding this causes SPF to fail.
And some of common pitfalls:
Multiple SPF records. DNS must contain only one SPF TXT for a domain. Two records break the check and cause failures. If you see multiple, merge them into a single string.
Lookup limit and long records. If you include many third parties, you can exceed the 10-lookup limit. Flattening reduces lookups by replacing includes with IPs, but it can become stale and cause errors when providers change IPs. Prefer tidy includes and delegate subdomains when possible.
Subdomain handling. Mail from news.yourdomain.com is evaluated against that subdomain’s SPF. If you use many platforms, consider authenticating a dedicated sending subdomain (for example mail.yourdomain.com) so the root domain stays clean.
DKIM. Signing, selectors and best practices
DKIM adds a digital signature to every outgoing email. It’s like sealing a letter with a wax stamp so the recipient can tell it hasn’t been tampered with on the way.
When a receiving mail server checks a DKIM signature, it can verify two things: the message was truly sent by the claimed domain, and the content wasn’t changed after sending. If the signature doesn’t match, the receiver treats the message with suspicion.
DKIM uses a pair of cryptographic keys — one private, one public:
— The private key lives on your mail server or inside your email platform. It’s used to sign each outgoing message.
— The public key is stored as a TXT record in your domain’s DNS. When someone receives your message, their server looks up that key to confirm the signature is valid..
A generic DKIM DNS record looks like this:
| selector1._domainkey.yourdomain.com IN TXT “v=DKIM1; p=PUBLICKEYSTRING” |
The part before the domain — selector1._domainkey — is the selector. Think of the selector as a label that tells the receiving system which key to use for verification. You can have multiple selectors, each pointing to a different key.
Each signature covers specific headers (for example, “From” or “Subject”) and the body of the email. This is called canonicalization — defining what exactly gets protected. If the content of those signed parts changes even slightly, the signature fails. That’s why DKIM sometimes breaks when email passes through a system that modifies messages, such as a mailing list that adds footers or subject tags.
Some mailing lists or gateways rewrite parts of the message. When that happens, DKIM can’t verify because the message is no longer identical to what was signed. You can reduce such problems by:
- Keeping message formatting simple and avoiding unnecessary reformatting by third-party systems.
- Using your own sending domain for newsletters instead of routing through intermediaries that edit the content.
- Checking that your email tools are DKIM-friendly and don’t change message headers during delivery.
How to setting up DKIM correctly:
- Generate a private–public key pair in your email system or command line.
- Copy the public key and publish it as a TXT record in DNS under a selector name (for example, selector1._domainkey.yourdomain.com).
- Enable DKIM signing in your sending system, referencing the same selector.
- Send a test message to a few accounts on different mail services and check the headers — you should see “DKIM=pass.”
- Keep the private key safe and rotate it periodically by creating a new selector.
DKIM gives mailbox providers evidence that your domain takes responsibility for its messages. Set it up once, monitor it periodically, and keep the keys current. This single step sharply reduces the chance your emails will be marked as forged or untrustworthy.
DMARC. Policy and reporting explained
DMARC tells receivers two things: which domain is claiming responsibility for a message, and what to do when that message fails SPF or DKIM checks.
It links the technical checks (SPF and DKIM) to a clear policy you publish in DNS, and it asks receivers to send you reports about what they see. That combination gives you control and visibility over who can send mail that looks like it’s from your brand.
Start with the policy approach. DMARC has three basic policy modes:
- p=none — monitoring only; receivers send reports but do not take action
- p=quarantine — mark or place failing messages in spam/junk
- p=reject — refuse delivery of failing messages
The safe, recommended path is staged: publish p=none first to collect reports and learn the full set of legitimate senders. Fix problems you find, then move to p=quarantine for a trial period, and finally to p=reject when you are confident legitimate mail is covered. Use pct to apply policy gradually (for example pct=20 applies the policy to 20% of failing mail) while you test.
DMARC records contain several tags. Here are the most useful ones and what they do:
- v= — protocol version (DMARC1)
- p= — policy for the domain (none, quarantine, reject)
- pct= — percentage of messages the policy applies to
- rua= — address for aggregate reports (XML summaries)
- ruf= — address for forensic reports (detailed failure info)
- aspf= — SPF alignment mode (r relaxed, s strict)
- adkim= — DKIM alignment mode (r relaxed, s strict)
- sp= — policy for subdomains (if you want a different rule than the root)
A typical, easy-to-copy DMARC TXT record for monitoring looks like this:
| _dmarc.yourdomain.com IN TXT “v=DMARC1; p=none; rua=mailto:dmarc-agg@yourdomain.com; pct=100; adkim=r; aspf=r” |
Place that TXT at the _dmarc host for the domain in your DNS. That is the standard location receivers check.
Reports come in two main forms:
- Aggregate reports are XML summaries that show which IPs sent mail for your domain, how many messages each IP sent, and whether those messages passed SPF and DKIM. They are safe to share with your team and are the core data you’ll use to find misconfigurations or rogue senders.
- Forensic reports include detailed message fragments and can contain sensitive data. Because forensic reports may include parts of actual emails, they raise privacy concerns and are less commonly used; many teams rely on aggregate reports only.
DMARC reports help you discover real issues fast. Finally, use DMARC reporting as an operational tool. Collect aggregate reports, parse them into readable tables, prioritize high-volume sources, and fix root causes.
After a monitoring period and targeted fixes, you can gradually enforce quarantine and then reject. That sequence reduces spoofing, gives receivers clear instructions about your mail, and gives you measurable evidence that email claiming your brand is legitimate.
When you can show that authenticated mail lands in more inboxes and converts better, the effort behind SPF, DKIM, and DMARC becomes measurable. It stops being a technical checkbox and becomes a lever that drives more revenue through the email channel.
It's time to try LetsExtract (it's free)
 Click here to download the LetsExtract Email Studio
The trial version will allow you to create a contact list, check email addresses and start mailing.